1995 Beaver Parts List

compiled by Mike Engen


Part

Part #

Manufacturer

Photos

General information

Serpentine Belt

5080610

Dayco


3926866

Cummins

Engine AC Belt

17465

Cummins


Engine Oil Filter

LF3000

Fleetguard

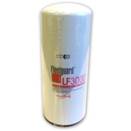
The engine oil filter located below the turbo on the driver's side of the engine, holds about 2 quarts of oil. Change after the engine oil pan is emptied.


CAUTION! The old rubber o-ring from the old filter likes to stick to the motor half and may not be noticed because it is up high. Then you screw on the pre-oil filled new filter and now have two o-rings plus the extra benefits of an oil leak. Make sure the old o-ring comes out with the old filter.


Cummins oil pressure is normally 10 PSI minimum @ idle and 30 @ 1200-1500 RPM


BD-103

Baldwin

51748

Wix

Oil


High quality 15W40 oil API CE/SG or synthetic

Drain Valve

F104

Fumoto


Primary Fuel Filter (w/water separator)

FF5052 w/o bowl

Fleetguard

http://i107.photobucket.com/albums/m304/ducatisti750SS/GS_Service/th_Pri_FuelFltr.jpg

The primary fuel filter, unless relocated with kit, is located on the passenger's side frame rail across from the engine fuel lift pump (middle of the engine block) and includes a water separator with drain.

FS1251 with bowl

BF1249 w/o bowl

Baldwin

S3201T with bowl

Alliance

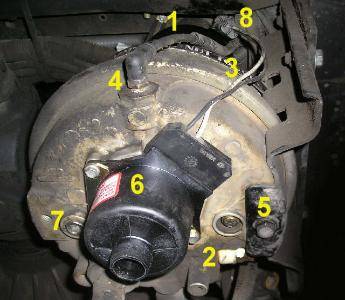
Secondary Fuel Filter

FF5018

Fleetguard

http://i107.photobucket.com/albums/m304/ducatisti750SS/GS_Service/th_Sec_FuelFltr.jpg

The secondary fuel filter is located near the passenger's side front top of the engine, just below the valve cover and the throttle cable linkage support plate. Access is best from underneath and reaching between engine and wiring harnesses.

Both filters need to be filled with filtered diesel fuel to overflowing before you screw the replacement filters back on to prevent needing to re-prime the fuel system. Some coaches have a "prime feature due to the electronic fuel pumps but ours is a Bosch mechanical unit. With all filters, you should fill (if possible due to mounting location) them through the "side" holes and not the large middle mounting hole as this gives the filter media a chance to "pre-filter" the fluids prior to introduction to your fuel/oil/coolant system.

BF988

Baldwin


33358

Wix

Coolant Filter

WF 2071


Fleetguard

·         Filters debris in coolant that causes engine wear

·         Extends water pump and thermostat life

·         Contains 4 units of DCA4 additive

Looking at the back of the engine, on the left side of the engine compartment, there should be a tank, which has a radiator cap on it, halfway down should be a sight gauge,. However, if the engine is warmed to operating temp, and coolant is showing on the gauge it should be ok. Cummins recommends the coolant be flushed out and replaced and new additive and coolant added at 50K miles


The coolant for a Cummins should be Fleetguard, you can use the "complete" version, which has the antifreeze and distilled water mixed in the proper ratio, plus the coolant additive to prevent cavitation. Or you can purchase the antifreeze only, and add distilled water so you have about a 50/50 or 60/40 mix depending on where you live and how cold it gets.

Do not put red in a green system. You can't just drain out the green and replace with red without changing the level sensors. Doing the change without a sensor change might have you broke down along the road as the system thinks it is out of coolant. Talk to Spartan if you really want to make the change and consider having it done at a service center.


To replace old green, open the drain at the bottom of the radiator and open the cap on the expansion tank. Do a flush and good drain on the radiator. You can then fill the entire system through the expansion tank opening and the system will remove all air bubbles itself as it idles at temp. Spartan said you can just add to that expansion tank and everything will be fine. You can use the concentrate with distilled water or you can use the green pre-mix with SCA added. After that is complete, add a 4 unit SCA coolant filter as well. Test on a regular basis.


If you have not had the coolant additive ratio checked in a while, it would be prudent to run it to a Cummins shop and have them check it and add the additive as necessary.


24071

Wix


Air Dryer

DQ6026

Haldex

1.      1. Desiccant Filter
2. Pressure Relief Valve Assembly
3. Strap Clamp
4. Small Air Hose Connection
5. Bracket Bolt (Cap Screw)
6. Plastic Purge Shield
7. Single 3/8" Pipe Plug
8. 12v Heater Connector


Skills Required: Strong arms to unscrew canister, strong hands to reconnect clamp.

Parts Required: Haldex DQ6026 kit, about $130.

(smaller kit DQ6022 no longer available)

Equipment Required:

Large filter strap wrench,

small torque wrench,

the following sockets:

deep well 3/8"  5/16"   9/16"  deep well 11/16", regular ratchet, medium flathead screwdriver,

(rare) 5/16" square (Robertson) bit, paper towels, degreaser spray, latex gloves, pipe sealant.


Time Required:

At  least 2 hours first time.

Desiccant Filter


Coalescing Filter


Air Dryer Filter Kit

DQ6050

Haldex


Includes both of the above items.

Repair Kit

DA331115

Haldex


Includes new purge valve, 1-way check valve, turbo saver valve and all related o-rings.

Haldex Air Dryer Repair Procedure

·         I was able to replace both filters by laying a piece of carpet over the batteries. This protects from acid on your clothing and shorting out the batteries when completely covered. Dispose of carpeting afterwards as there is the potential for acid on it. If only changing filters and valve, you can do the filters from above and valve from below without removing the entire unit. If you need to remove the entire unit, follow all of the steps below. On the 95 Beaver Patriot Trenton, you have enough room to squeeze your head and upper body to inspect unit.

·         Release all air from system using t drain valves located under passenger side of coach on both air tanks.

·         Loosen large Desiccant Canister (1) using the filter strap wrench, but do not remove yet because
there the likelihood of grime falling down from the overhead wiring. Expect to use a lot of force but make sure you turn counter-clockwise looking from above.

·         Remove the small air line (4) using a 9/16" open end wrench after removing grime from around it.

·         Disconnect the heater wire connection (8) by lifting the locking tab slightly on one side and
pulling.

·         Remove the bracket bolt (Cap Screw in the DQ6026 instructions) on the bottom of the assembly
(5) using the 9/16" socket.

·         The Pressure Relief Valve (2) can be changed in place by crawling under coach and slipping a box end 11/16" wrench over
the end and removing the valve and wrench together.

·         Open the strap clamp (3) fully using the 3/8" deep well socket.

·         The assembly will still be connected by two air hoses, but it can be gently pulled down and tilted
forward to allow easy removal of the Desiccant Canister and visual inspection of the cavity, after
cleaning around the outside of the old filter first.

·         Reach inside and pull out the white Coalescing Filter by pulling on two of the four plastic tabs.

·         Install the new o-ring on the new Coalescing Filter, apply silicone grease, and insert. Be sure to
push it all the way down like the old one.

·         Apply silicone grease to the large Desiccant Canister outer seal and then screw on hand tight for
now.

·         Replace entire assembly back onto the lower bracket and reinstall bolt (5) using 9/16" socket to
30 lb-ft torque.

·         Reconnect strap clamp (3) and tighten to 6 lb-ft. Be careful not to get air hose or heater wires
under the clamp.

·         Reconnect small air hose (4) using 9/16" open end wrench.

·         Reconnect heater wiring (8).

·         Tighten Desiccant Canister (1). Manufacturer recommends hand tight, but I snug it with the strap wrench.

·         Install the new Pressure Relief Valve (2) if you haven't already, using 11/16" socket to 15 lb-ft torque.

·         Remove the three screws holding the old Purge Shield (6). Use the flat-bladed screwdriver to pry
the shield gently around the edges, a little bit at a time because it's stuck on and fragile.

·         Replace shield gasket, new plastic shield, and metal plate. Torque screws to 3 lb-ft after making
sure the heater and gasket are resting loosely underneath the shield.

·         Remove single Pipe Plug (7) using 5/16" Robertson bit, drain contaminants if any, apply pipe
sealant to threads of plug, and reinstall, tightening to 12 lb-ft torque.

·          Power air system back up. After system airs up fully, turn system off and verify no air leaks from replaced components.